

When we bought our house in 2014, it was love. Really it was, I loved this house the moment I walked into it! All the could be’s of this house had my mind reeling in all the possibilities! This house wasn’t finished when we purchased it, and it needed a ton of work to get it up to code before we could even move in. But we saw endless possibilities of what this house could become! I knew Cody and I could tackle it and all of its wacky problems and turn it from just a house to a home! So for the first few months we had to get it up to code and honestly we just wanted to move in! We had already sold our other home and we were scrambling to get into our new home! Side note, our first home was amazing! It was my dream home, an 1897 beauty with so much charm! I will do a blog post later just to show you all what we did with that house! I still regret selling it, because it was so charming and held so many memories for me.
Anyways back to our current brand new yet fixer upper! We finally were able to move in literally on Christmas Day in 2014! We ate Christmas dinner on carboard boxes and it is to date one of my fondest Christmas memories! We were so excited to finally be in our home! Even though the house was a new build, there were still things we wanted to change to make it more us! We also couldn’t afford to do all the changes we wanted to right away! This was a killer for me! I have the patience of a two year old! When we bought this house we were in the thick of adopting our son from Bulgaria! Those of you that know anything about international adoption, know it’s not cheap! We were pinching pennies to get our angel home! So three and a half years later it’s finally time to update this house and really make it a home! Thank goodness!
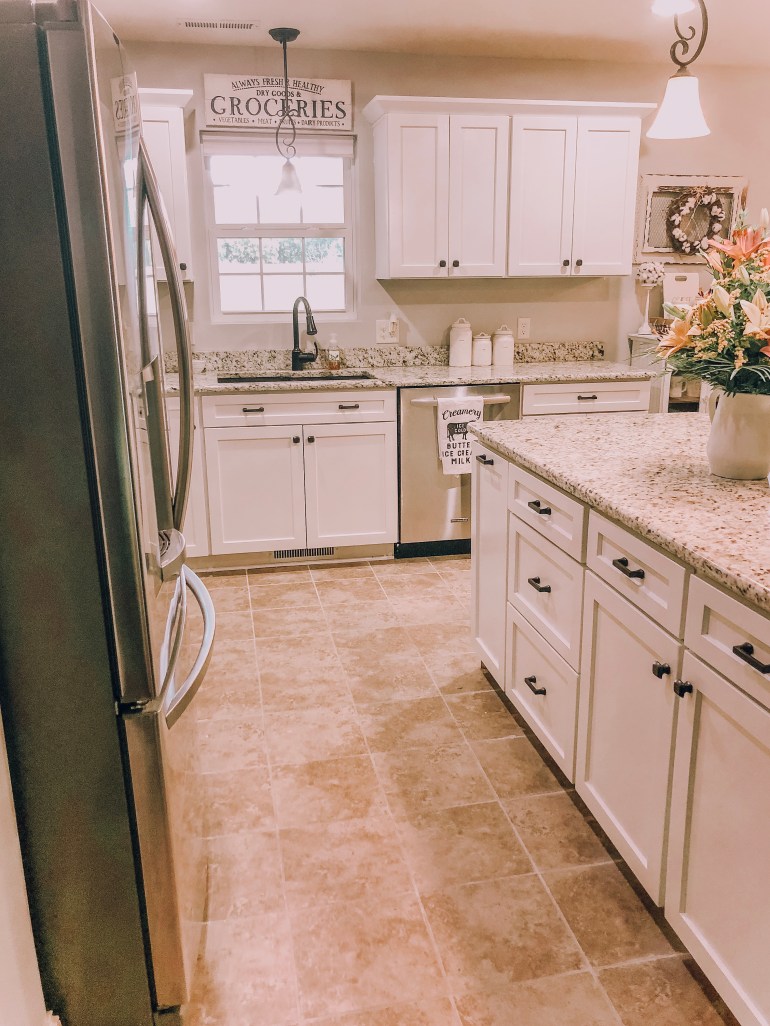
So the first thing we wanted to do, ok wait, the first thing I wanted to do was make some quick changes to the kitchen! I personally have always wanted a bright white kitchen! There’s just something about a white kitchen that screams to me! So we decided to do some quick changes to our cute kitchen first.
The first thing we did was add some wainscoting and trim to our island. I wanted to add some texture and depth to the kitchen and this was exactly what it needed! Then I went ahead and painted all the cabinets and island in a very long grueling process! Now that I am finished, hallelujah, it was 100% worth all the time and patience. Remember, I have the patience of a two year old, and these cabinets surely felt like they would be the death of me! But I promise if you decide to refinish your cabinets and go about it the right way, it is so worth the time and effort! So here’s what we did! I will lay it out step by step and list the supplies I used!
Supplies:
Degreaser
Sand Paper in 220 Grit
Primer
Painters Tape
Cabinet Rollers
Trim Brush
Behr Ankyl Semi-gloss Enamel Paint
1.) The first thing I did was use a degreaser to clean all the cabinets thoroughly! I just went to Home Depot and asked them what they recommended and this is what they told me to use! We also got it in the painting section.
https://www.homedepot.com/p/Krud-Kutter-32-oz-Kitchen-Degreaser-Spray-305373/301476517
2.) Then I removed all the hardware, hinges and drawer fronts on the drawers. I also labeled everything so I knew exactly where it needed to go when it was time to put the kitchen back together. This helped significantly at the end of the project! After everything was cleaned and all of the hardware was removed I lightly sanded everything! Then used a dust cloth to wipe everything down.
3.) Then I primed everything! I used Killz primer. I did two coats and sanded everything in between each coat and then I let them cure for about 48 hours. I also allowed 24 hours of dry time between each coat. Again worst thing ever for someone who lacks any form of patience!
4.) After the primer had cured I then got down to business with our actual paint! I went with Behr’s Alkyd Semi-gloss Enamel Paint in Glacial Mist. Again I did two coats of this paint, allowed 24 hours of dry time between coats and sanded very very lightly between coats! Also make sure to use a dust cloth to wipe down before you paint! And that’s it! Then it was time to put the kitchen back together again! I also used a cabinetry roller (I believe I used a 4 inch roller) and a trim paint brush. Both of these you can just find in your painting section at any hardware store!

As of right now I can’t think of anything I would’ve done differently! But I will make another post in six months or so to let you all know how they’ve held up! But so far so good!!!! It did take me forever to complete this project. But I also have a toddler at home with me, and my husband was out of town the entire time I worked on this project. So if you had more than one person and someone to watch your kids it could be done quicker! This project took me roughly 21 days to complete! I did do it in sections though which took longer! I started with the island, finished the island, then moved to my lower cabinets and then finally finished our upper cabinets! All I can say is don’t skip your prep work! It’s time consuming but worth it! Overall I’m very happy! I’ll share more photos once our flooring is installed and we decide on a backsplash (this may never happen, I change my mind about back splash more often than I change my clothes). This project was a great way to save some money and totally change the look of your kitchen!

Xoxo-
Janae Lee

Looks great! Are these oak cabinets? I want to paint mine white but have heard that I need to spackle first to even out the characteristic lines of the wood.
LikeLike